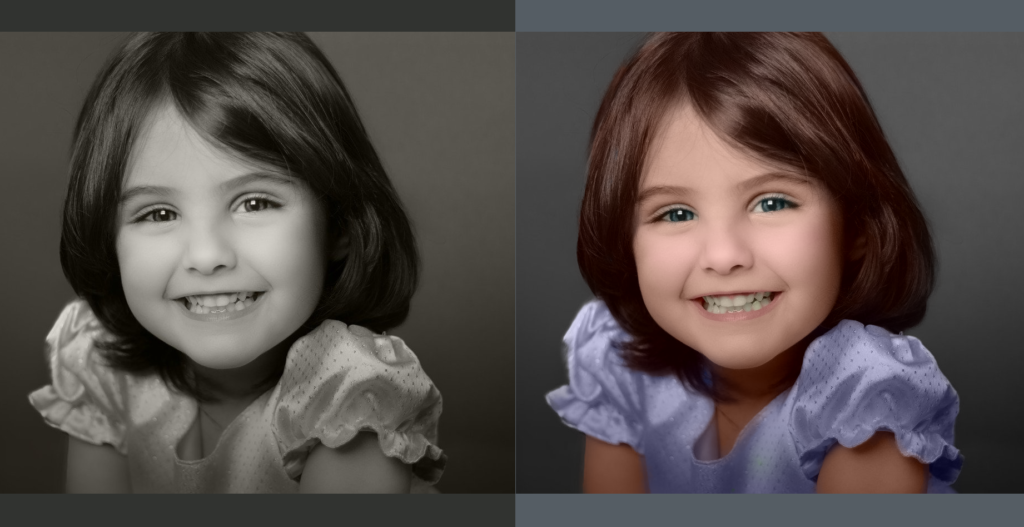
Bringing a black and white portrait to life is one of the most emotional colorization tasks. CODIJY turns it into a joyful creative process. Take this lesson to find out “how”!
In this lesson you will:
- learn basic tactics & essential secretes of the realistic portrait colorization in CODIJY
- learn to work with Color Libraries related to appearance
- make first steps in using Gradient feature
NOTE: The example was created using new set of Color Libraries added to CODIJY Colorizer Pro, version 3.7. If you are using an older version or CODIJY Recoloring please:
- use provided HEX colors instead
- pick your own colors using libraries, available in CODIJY Recoloring
Get ready
Step 1. Save the below grayscale image to your drive.
Step 2. Launch CODIJY and open the image (Ctrl + O (Win)/ Cmd + O (Mac)).
Step 2. Save the image to CODIJY Document (Ctrl + S (Win)/ Cmd + S(Mac)).

NOTE: Starting from version 3.7.5, CODIJY will automatically save your work in progress. You can adjust Autosave intervals in Preferences – > Tools.
Step 3. Enable Pen Tool ![]() and switch to the Freehand drawing
and switch to the Freehand drawing ![]() . In this lesson, you will work with the curved masks.
. In this lesson, you will work with the curved masks.
Step 4. If the image opens up minimized, zoom it out or select the Fit to View option in the Navigator.

Open Color Libraries
Before you start, open several libraries: Complexion: Tanned, Eyes: Iris, Eyes: the whites, Fabric: Miscellanea, Hair: Brown, Lips: Children, Photo Backgrounds and Teeth.
Step 1. Navigate to Color Libraries window on the right and select the library from the drop-down list.
Step 2. Click the Open in Window icon that appears next to the drop-down box. The library will open floating above the Work Area.

Note: CODIJY Colorizer Pro offers 26 libraries for portrait colorization including variaty of hair tones, skin complexion, eyes etc. There are also palettes for the fabrics & outfits.
Step 3. To arrange the open libraries, drag them by the headers.

Get Started
Pick the skin tone
Pick the highlighted color (#eac0b0) from the Compexion: Tanned library. The slightly tanned skin tone will make a natural combination with the girl’s chesnut hair.

Tip: If you cannot find the suggested color, copy its HEX value and paste it into the HEX field if the Color Picker dilaog.
Apply skin tone
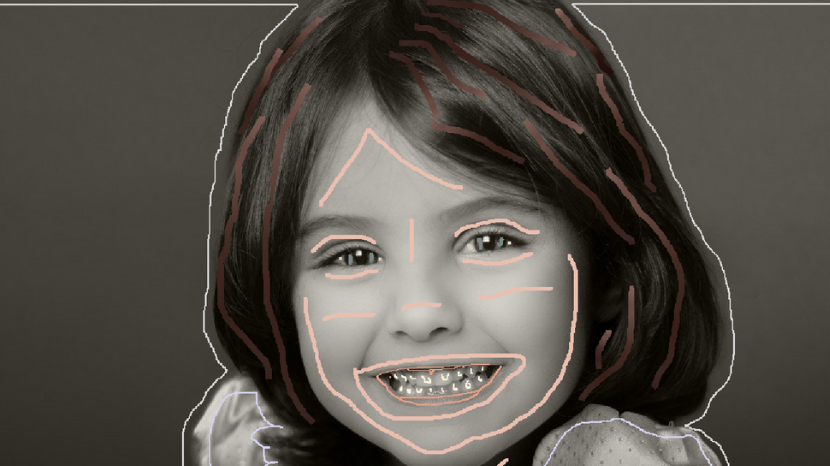
Add masks to the face, neck and hands.

Remember: Draw masks close to the area boundaries, without stepping on them.
Draw strokes above and under the eyes, and around the mouth.

Several masks over cheeks and nose will let you further create lively splashes of pink there.
Eyes irises
Pick the gray color (#7b898a) from Eyes: Iris and draw tiny strokes above the iris. You will be surprized with the eyes color you will obtain after processing!

Tip: Use Navigator to zoom and navigate images while you are drawing.
Eye whites
Pick color (#d5cec4) from Eys: the white. Add color dots over the eyes. Generate preview ![]()

Remember: What we perceive as the white part of the eye is never monochrome white. To ensure a natural-looking result, please use ready colors from the related Library. Avoid using Decolor or Color Protection masks over these areas.
Tip: The tone of the eye white of the adult is generally beige or light pink.
The smile
The smiles are huge attention-grabbers. We will show you how to professionally colorize the mouth area.
Step 1. Enable Instant Preview ![]() for the mouth area. Decrease the brush size to 1 px for the upper lip.
for the mouth area. Decrease the brush size to 1 px for the upper lip.
Step 2. Pick the coral color (#e49785) from Lips: Children.
Step 3. Draw a mask over the upper lip. Make an additional stroke over the upper gum. Then, increase the brush size to 2-3 px. Draw the next mask over the lower lip.

Check out the preview. Does the color fill the area precisely?

Teeth
Pick the color (#fbf5df) from the Teeth Library. Draw a single stroke over the upper and lower row of teeth. Alternatively, add contours to each tooth. The latter technique allows to adjust the color of each one individually, as the colors of the teeth may vary.

Preview result. The upper gum was not filled correctly, because the border there is not quite distinct. We will add one more stroke to define the area boundary precisely.

Pick the “lip” color from the History. Add a small stroke above the upper teeth.

Dress & Background
It’s time to colorize the dress and the background. Pick whatever colors you like from the Fabric: Miscellenea and Photo Backgrounds Libraries. Draw masks as shown in our example!

Let’s generate preview and check the result. It looks pretty fabulous!

Hair
To add natural tone to the hair we will make use of the gradients– the multicolor masks that allow recreating transitions of several colors with a single stroke.
Step 1. Switch to the Gradient Pen ![]()
Step 2. Open the Hair: Brown Library and scroll down to gradients.
Step 3. Pick a Gradient.

When you select a gradient, it opens in the Gradient Settings.
You can adjust transitions of each stroke by dragging its handles. The click on the handle opens the color editor for each color.
Try to position the lighter part of the gradient above the highlights of the girls hair. Keep drawing to stretch it over the dark areas.
NOTE: The ready gradients were captured from the color images and present the color diversity of the live colors. The light and dark tones in the gradient are generally different hues and will therefore add realistic look to the object.
Now let’s preview the result.

Repainting lips
After we finished the first color draft, we can spot that the lips look execcessivly saturated and therefore unnatural. Let’s make a quick adjustment with the help of the HSB Repaint tool.
Enable HSB Repaint ![]() under the drawing tools and click the mask.
under the drawing tools and click the mask.

Decrease the mask Hue and Saturation to 6 and 27 respectively.

Preview the result. After adjusting the tone of the lips, the teeth start looking greenish. To fix this, repaint the mask over one tooth (select the parameters shown on the screenshot). Then use the Color Picker tool and the Repaint Bucket to repaint the other masks.

Add the final touch. Change the color of the masks over the cheeks and the nose into the pale pink. Use suggested HSB values (H 10 / S 25/ B 92).

Now, check out the result. Will you tell that this image was colorized?

Congratulations on completing your first portrait!
Finish and save your work
- Save your document (Ctrl + S (Win)/ Cmd + S(Mac)) .
- Export image preview to JPEG, PNG or other formats. Long-press Save
 and select Export Image from the drop-down list.
 - Export Color History to a new Library and save these colors for future reference!
