What is the best way to draw color masks? How does CODIJY interpret and apply colors? You will soon get the answers, if you try this glossy example!
In this lesson you will:
- learn how to add color masks to large areas quickly
- practice drawing decolor masks
- learn how to change the color of the masks with HSB Repaint
- learn to export result and save your work
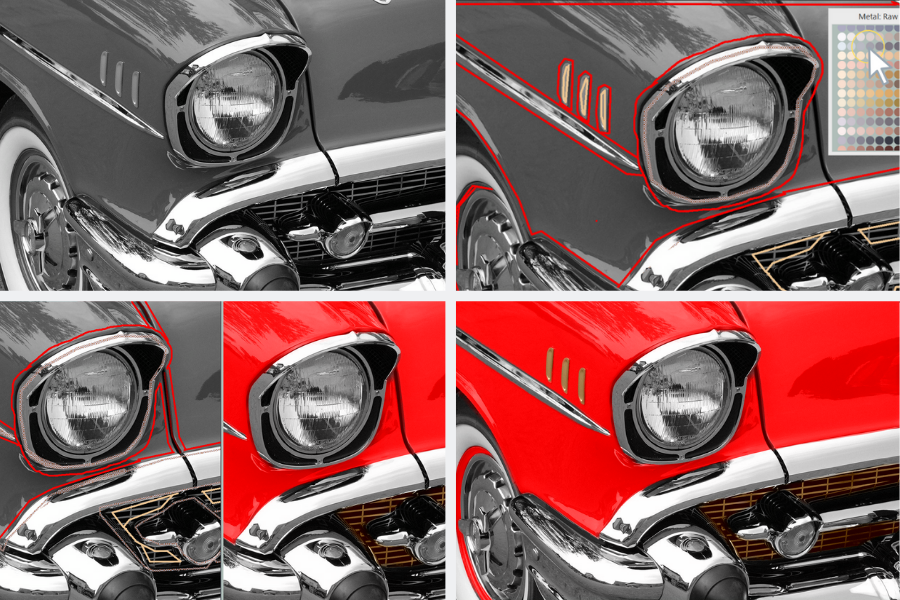
The image contains several large areas. We will add colors to the hood, fenders, grill and the emblem. The parts like grill frame, bumper, wheel cap will look equally perfect, if we leave them in grayscale.
Get ready
Step 1. Save the below image to your computer.
Step 2. Launch CODIJY and open the image (Ctrl + O (Win)/ Cmd + O (Mac)).
Step 3. Save the image to CODIJY Document (Ctrl + S (Win)/ Cmd + S(Mac)).

NOTE: Starting from version 3.7.5 CODIJY will automatically save your work in progress, when it was previously saved to the CODIJY document. You can adjust Autosave intervals in Preferences – > Tools.
Get Started
- Enable Pen Tool
 .
. - Switch to Line Mode

- Adjust the brush size to appx 5 pixels. Note: The photo areas are large and the thicker strokes will be more prominent.

Step 3. Open any color library. We picked: Car Paint from 1960th.

Step 4. Pick the color. You can make your own choice.

Add color masks
The rules of adding masks in CODIJY:
- Draw masks close to the border.
- To enable Border Detection, add colors to all bordering areas. Only in this case, CODIJY will identify borders, when processing the image.

Why liner masks are better for large areas?
You can draw masks with freehand strokes or lines.
For large areas, line masks are generally a better choice. They are quicker to draw and let you better keep control over the distance to the border. Freehand masks are easier to draw over the objects with irregular shape and the small-size areas.

Drawing color masks
Let’s start with the hood. We will add a single mask over it.

Note: The single, connected mask is not a requirement. You can draw several or multiple strokes instead. Still, should you decide to repaint this area, the single mask will be an advantage!
Drawing line mask without releasing the mouse button
You can complete this mask without releasing the mouse button (or raising the pen) with the help of two shortcuts!
- Press Spacebar to cut off the line and change direction.
- Press and hold Spacebar to switch to Freehand drawing
We recommend practicing to use these shortcuts in order to save time on future colorizations.
Now, follow the instructions provided on the screenshot.

Add colors to the remaining areas
As the next step, add masks for all major areas, excluding the ones, we want to leave in grayscale. Pick a tone of yellow from the Metals: Raw Materials Library for the radiator grill and the side decoration of the car.

Add Decoloring Masks
Now, lets add masks to the areas that we decided to leave in grayscale.
Tip: If your image is pure monochrome, you can use either decoloring or color protection masks for grayscale areas.
Step 1. Enable Decolor Pen ![]()
Step 2. Draw the decolor mask. It will be displayed as the pattern ![]()

Note: You don’t have to draw masks for each individual element, if they belong to the same color area. Just define the area boundaries and outline them.
In case there are color masks inside the area, add the strokes near the related border.

Generate result preview
All masks are done and it’s time to generate the preview of the color result.
To generate preview, launch Full Image Processing. Press Ctrl + R / Cmd + R or click the related button on the toolbar ![]()

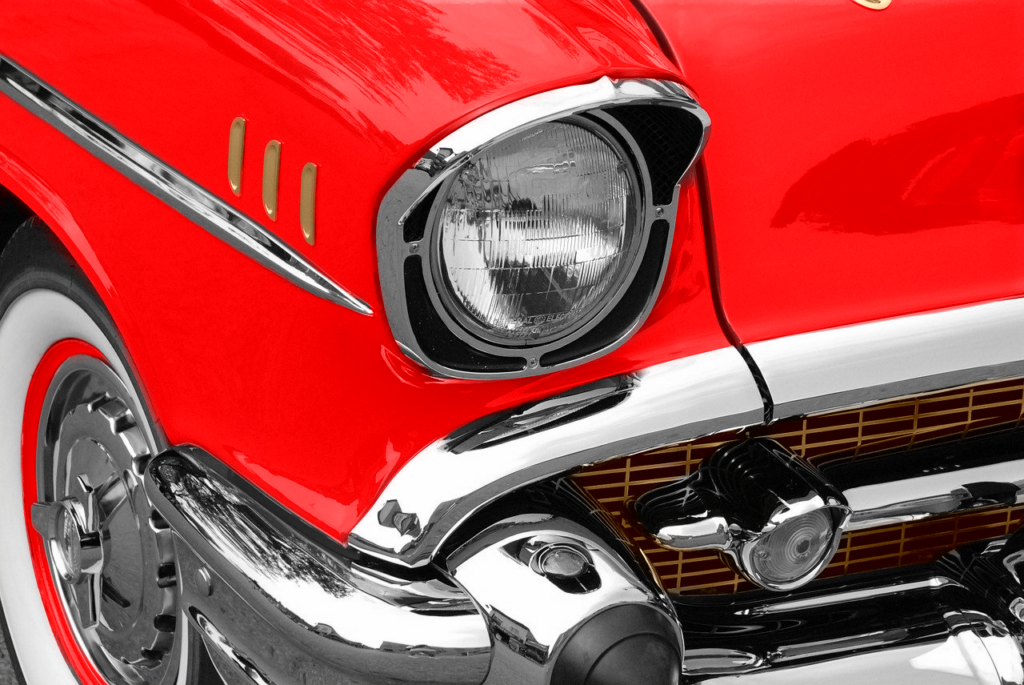
The result is pretty impressive, isn’t it? Pay attention to the reflecting objects. The reflections look so much natural, thanks to the way CODIJY “translated” the original shades of grayscale into the related tones of the red color. e.g. Sky reflection appears lighter than the rest of the hood.
Edit colors
To complete colorization of this image, we will have to fix one issue. As you might have noticed, the split between the hood and the fender looks lighter, than it would appear on the color image. This may happen, when you colorizer the parts of the objects that are in the shadow with a bright, saturated color.
To darken this part, we need to add the new mask over the split and adjust its brightness using the repaint tool.
Step 1. Remove the part of the masks using Eraser ![]() . This will prevent recoloring of the whole area, once the new stroke will get recolored.
. This will prevent recoloring of the whole area, once the new stroke will get recolored.
Step 2. Add the new mask over the split. Be sure to add additional red strokes on the both sides of the split to avoid spreading of the new color across the border.

TIP: When you try new colors, the best option rarely comes at once. To save time, let’s enable the Instant Preview Mode and preview result with different tone options in the real time!
To enable Instant Preview:
- Press Alt+R or click the Partial Image Processing icon

- Select the part we will work upon to speed-up processing
- Tick the Instant Preview box in the bottom left corner of the dialog
- Click the Instant Preview button.

Step 3. Open HSB Repaint:
- Press (H) or click HSB Repaint icon on toolbar (see the screenshot)
- Click the mask.
- The HSB Repaint dialog will pop up. It offers the quick options to adjust Hue, Saturation and Brightness of the mask color.

Step 4. Decrease the brightness of the stroke. Compare the result against the upper part. The darker tone added visual depth to the split.

Note: When the Instant Preview mode is on, CODIJY will generate preview in the real time. Just track the tiny progress bar that appears on the Partial Image Processing icon ![]() . It will show you, when the updated preview is completed.
. It will show you, when the updated preview is completed.
Step 5. Set same Brightness value for the upper stroke. There is no need to generate preview – it will be ready soon after.
Save your work
After you complete editing, please save your work to the CODIJY document (MGD):
- Press Ctrl +S (Win) / Cmd +S (Mac)
- Click Save Document icon on the toolbar

Note: The document saves the masks that will allow you to proceed with coloring later. It also saves the Color History. In CODIJY Colorizer Pro you can export History to the new library and use the selected colors and gradients for future works.
For CODIJY Trial Users: you can open saved documents in the registered version of CODIJY and generate result without watermarks. Your efforts won’t get lost!
Export Result Preview to the Image
You can export result preview to PNG, JPEG, TIFF and other graphic formats.
Option 1. Go to File -> Export Image
Option 2. Click the Save Document Icon ![]() . Hold it for a second to call a drop down menu. It will offer two options: Save Document or Export Image.
. Hold it for a second to call a drop down menu. It will offer two options: Save Document or Export Image.
